After like ages I'll start posting again. In the last weeks I've finished some nice sewing projects I would like to share. I just have to get my camera and take pictures of everything.
I made 2 little baggies ( like for cosmetics or cellphones)
1 small messenger bag in cow print for Daniel
2 duffel bags (one bigger, one smaller one) - I'll try to post a tutorial for that
1 little softy animal - an exaggerated version on a bunny probably from Japanese craft book
my newest project that I just finished yesterday night: a short nice fitting pleated skirt in 2 colors - also for this one I am going to post a tutorial. This one not only came out super cute but was not that difficult to sew. I just took time to plan and understand everything. But the second one I probably could sew in a few hours.
Sunday, September 30, 2007
Tuesday, March 13, 2007
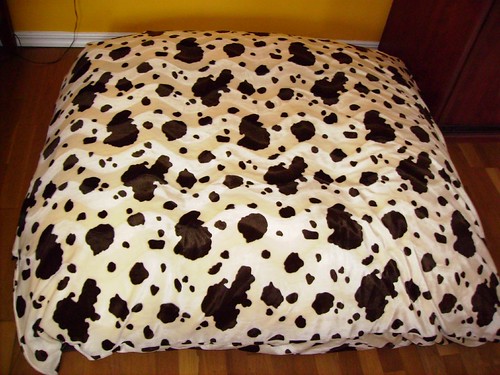
Giant Sumo Beanbag
Yesterday I finished the Birthday present for my Dovi. I decided to make him a giant pillow beanbag. The idea I got from one of the web pages that sell them. It is basically a pillow shaped beanbag. But you can form various sitting arrangements with it. They called it the 10 in 1. You not only can lie on it but shake it up and arrange a different position and sit and lounge on it. It is really great. For the fabric I chose a brown cow print. Something I guessed Dovi would like.
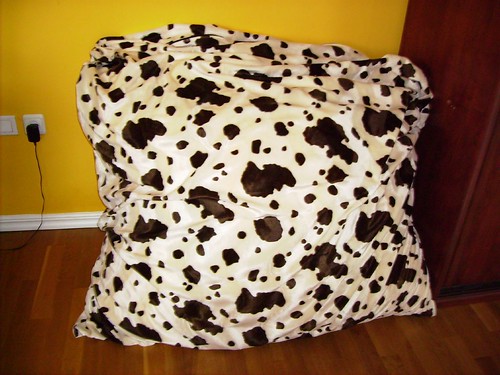
If you are afraid it might take to much space, just shake it and stand it up in a corner.
The measurements are: 5.4' x 5.5' which is 150 x 165 cm. (Plus add seam allowance)
To make it is really simple:
I bought about 4m of fabric. It has to be as wide or wider than the shortest side. Then you just measure 150 x (2 x 165) 330.
Now you only have one piece and need to sew right sides together two sides. Then turn it inside out and attach the zipper to it. Finish off the last side with the zipper in.
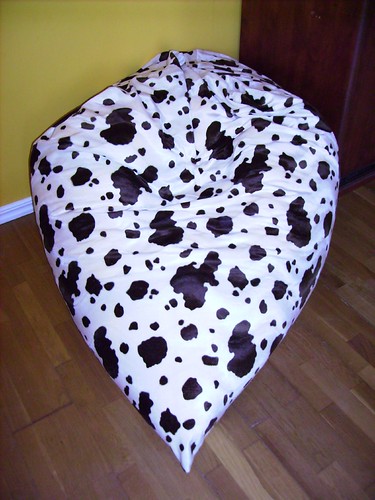 one of the sitting positions that support the back and neck really well
I have several tips for you:
* Try to sew all sides with double stitching. (You can use a twin needle for it)
* I also made an inside bag with about the same dimensions or larger. Then you easily can change the cover and put it in the laundry. And in case a seam rips you the polyester beans don't spill on the floor.
* Try to get a very strong quite long zipper. Mine was 1m in length.
In one of the shops we have here in the area I have seen that they use some kind of stretchy cotton fabric. (Moms probably know this one from the "natural" baby carriers that is made out of only one piece of long stretchy fabric...)
Next time I get to Tel Aviv I have a look if I find something similar.
Also I saw a banana like design on the Internet. Maybe I'll try that soon too.
If you are afraid it might take to much space, just shake it and stand it up in a corner.
The measurements are: 5.4' x 5.5' which is 150 x 165 cm. (Plus add seam allowance)
To make it is really simple:
I bought about 4m of fabric. It has to be as wide or wider than the shortest side. Then you just measure 150 x (2 x 165) 330.
Now you only have one piece and need to sew right sides together two sides. Then turn it inside out and attach the zipper to it. Finish off the last side with the zipper in.
I have several tips for you:
* Try to sew all sides with double stitching. (You can use a twin needle for it)
* I also made an inside bag with about the same dimensions or larger. Then you easily can change the cover and put it in the laundry. And in case a seam rips you the polyester beans don't spill on the floor.
* Try to get a very strong quite long zipper. Mine was 1m in length.
In one of the shops we have here in the area I have seen that they use some kind of stretchy cotton fabric. (Moms probably know this one from the "natural" baby carriers that is made out of only one piece of long stretchy fabric...)
Next time I get to Tel Aviv I have a look if I find something similar.
Also I saw a banana like design on the Internet. Maybe I'll try that soon too.
Friday, March 2, 2007
Stripey Long Tote
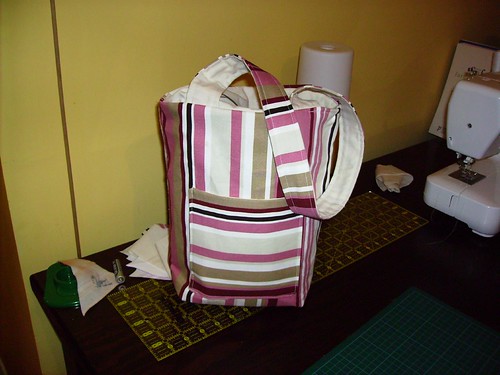
On Monday I went to Tel Aviv to go to my doctor. I always use that opportunity to drive by the fabric street on Nachal Binjamin. There they have everything from fabrics, buttons, interfacing, sewing machine supply, sewing supply, .... I got some nice fabrics and decided yesterday to make a long tote bag out of one of them:
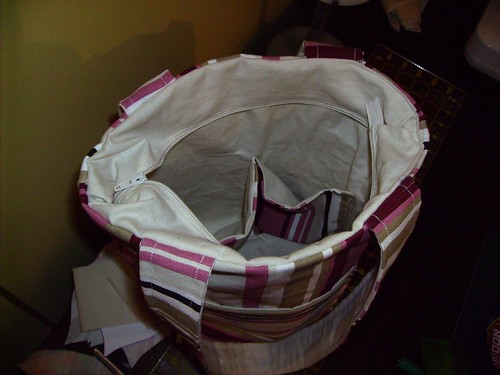
The raw measurements are:
body of bag: 37x31 cm; 14x12 in
pockets inside: 19x31 cm; 7x12 in
pocket outside: 17x17 cm; 7x7 in
straps: 7x71 cm; 2 3/4 x 28 in
bottom corners of bag sewn in: 2 1/4 in
zipper fabric: 28x7 cm - take care that it is slightly less long than the bag is wide...
zipper: 28 cm long - if you have a slightly longer one just trim it
I cut all the pieces stripes horizontal except for the outside pocket and the straps. These two I cut out the other way.
I used off white linen fabric for lining.
I used heavy fuse able interfacing on the body of fabric and lining.
Interface all 4 body pieces (with hot iron and a lot of pressing).
The basic rule for making a bag is: Start doing the pockets first: Sewing pockets fabric and lining (right sides inside) on three sides together - leave the other one for turning inside out. Turn and sew the last side. Then attach the pockets to its place: eigther the outside body or the inside one. Take care about the direction of the stripes on the outside one. The inside one I divided into two.
Hem the zipper fabric from both length sides. Sew in the zipper, secure and shorten it if necessary.
Sew the fabric body on the three sides (right sides inside) together. Fold the bottom "ears" and mark at 2 1/4 in with a line. Sew it.
Repeat for the lining.
Attach the zipper fabric with its zipper sewn in to the lining fabric.
Make the straps: Right sides inside, sew two long sides and one short side together. Turn inside out. Sew 1/4 in all the long way on both sides.
Put the bag together for final sewing:
Outside fabric - on the outside - right side inside - left side outside
Inside lining - on the inside - right side outside - left side inside
Put the straps inside the bag accordingly so that only a tiny bit looks out. Take care not to mess up with which part will be worn at the end inside (if you used different fabrics)
Pin in place and sew all around except for one place between the handles for turning. Turn and sew that last bit.
Finished!!!
Friday, February 23, 2007
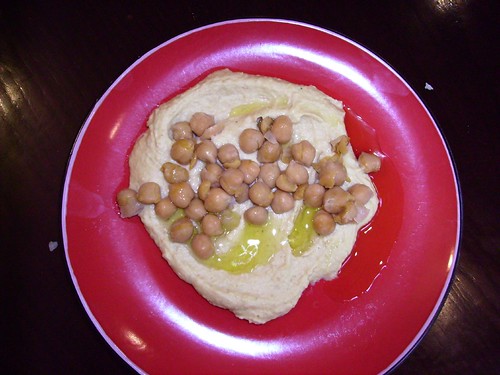
Humus
Today's recipe I want to share is Humus. Not only is Humus very delicious but also very healthy - especially compared to all the bought ones you get. They contain not only preservatives but also to add more weight a lot of fat. Enough of the small talk, let's get going:
 Take about 500 gr of dry Chickpeas and let them soak in plenty of water for about 24 hours. Every now and then you change the water in which they soak.
 - After that you put them in a pressure cooker, add one whole pealed onion and fill the pot until the marking of your pot with water. (Take care not to fill too much!)
 Let that cook for about 1 1/2 to 2 hours. If you are unsure at the first time just open the pot after the 1 1/2 hours and check if the peas are soft. They should easily squash in your fingers. If not put them back for another half hour.
 After the are soft (by that time they will have soaked up almost all of the water) take them out and put them in the Food Processor. Add 2 - 3 cloves of freshly minced garlic, about 1/2 cup or more of Techina (Sesame Paste - liquidity - also used to make Techina for eating), 2 or more ladles of the water the Humus was cooked in, 2 TB parve (not meaty) Chicken Soup Powder, 3 TB Olive Oil, some Tabasco, 1 TB ground Cumin and if you want 1/2 TB Curry Powder. Let it all process until its smooth.
  Serve with some of the leftover Chickpeas and some Olive Oil. Best to eat when it's just freshly made and still warm.
Now some tips:
Because it takes a lot of time of soaking (24 hours) you can soak more in advance. Cook it all and before you put in the other ingredients just put in bags and store in the freezer. Like this you can just defrost a portion in a few minutes and have the Humus ready in no time! This is specially recommended if you have inpatient toddlers who suddenly demand Humus. They don't understand that it takes 24 hours to soak and another 2 hours to cook ;-) ....
The original way is without the Curry Powder. So if you don't like it this way just omit it.
The ready made Humus stores in the fridge for a few days. By then you probably have eaten it already...
Bete Avon! - Enjoy the meal in Hebrew...
Thursday, February 22, 2007
My Pillow Quilt
I want to show you my first Quilt Project I made about half a year ago.

It's made out of 3 different cotton quilt fabrics and 1 dark blue corduroy fabric.
At the same time I made 3 more - they are almost finished. I should really finish them completely. Maybe soon.
But my plans for my next project I want to start today is a simple Baby Quilt. I'll keep you posted on my progress.
Wednesday, February 21, 2007
Header Image in Blogger
Recently I found out how to put a Header Image into a Blogger Blog. I'll show you exactly how:
(by the way, I am using the new version of Blogger)
Before you start changing anything on the template, please make a copy!
First you have to find this kind of code:
/* Header
In between the line that begins with border ends with the curly brackets you copy:
background-image: url(http://www.photobucket.com/albums/xxx/xxx.jpg)
Instead of the demo link I provided you enter the web page where your picture is stored.
Have a look:
#header-wrapper { width:660px; height:250px; margin:0 auto 10px; border:none; background-image: url(http://www.photobucket.com/albums/xxx/xxx.jpg) }
#header { margin: 5px; border: none text-align: center; color:$pagetitlecolor;}
I also adjusted the dimensions and set the border to none.
Save it and you should be done.
Please leave a comment if you find a different way.
Move out the Family Section
I decided to move my Family section to another blog to keep it more private. The previous post explains why. This way I will be able to enjoy both topics and don't have to regret somethings I post.
Privacy with a Blog
Yesterday night I spent all time registering my blog with "Blog Traffic Exchange Directories" and "Blog Search Directories". But then suddenly I asked myself if I want to give strangers such a close view of my life. I post quite a lot of private pictures. That could in the end be harmful to me and my family.
So, after like spending a few hours setting everything up, I decided suddenly at midnight to take, all the links and connections I made, down again. I might decide to split my Blog into two - and just open another one for Public viewing, where I don't have to be too concerned with the privacy.
I also discovered something fun yesterday night:
These Blog Trafficking Websites work like this: You register your own Blog and make it visible and available to others, but in exchange you have to read and look at other Blogs so that they also get counts. That was actually quite fun to browse randomly different websites. That system works with a timer (like 20 seconds or so) where you have to look at it and then you decide if you want to stay or go on onto a different one.
If you want more information just have a look, there are several out there:
http://www.blogexplosion.com/
http://www.blogsoldiers.com/
http://www.blogazoo.com/
http://www.blogadvance.com/
Reports claim, that this system is not really working. OK, you will get more hits and exposure, but in the end the question remains: How many people will keep coming back to your Blog? You don't just want that someone blinks for a few seconds at your blog, but build a community with like minded people.
But I guess you could just as well be browsing Blog Search Engines. There are several out there as well. And there you can target probably better what you're looking for.
http://www.technorati.com/
http://blogsearch.google.com/
http://www.bloghop.com/
http://www.blogarama.com/
http://www.blogcatalog.com/
Have also a look at: http://www.weblens.org/blogs.html . This site has some good information about all these topics and more.
Tuesday, February 20, 2007
Birthday Delicious Chocolate Cake

preheat oven to 150 degrees Centigrade
2 c Flour
2 c Sugar
3/4 c Cocoa (dark unsweetened)
2 ts Baking Soda
1 ts Baking Powder
1-2 ts Instant Coffee
1/2 c Vegetable Oil
1 c Milk
2 Eggs
1 ts Vanilla extract
First mix the dry ingredients then add all the wet ingredients.
Don't over mix.
Pour into greased pan.
Bake for 1 hour.
After the cake cooled cut it through the middle and fill with apricot jam.
You can use any jam you want, but jams with some acidity give the cake the best taste.
Put back together and cover with Chocolate Spread like Nutella.
Best to put for a few hours or a day into the fridge before serving.
Potatoe Roesti from the Oven

Recipe for 2;
preheat oven to 200 degrees Centigrade
cut about 6-8 medium Potatoes into 1cm cubes
put in Pyrex dish and season with Olive Oil, freshly ground Black Pepper and coarse Sea Salt
bake for about 40 minutes until golden brown and done
don't forget to mix them up once or twice during baking!
for added flavor put some crushed garlic before serving over the potatoes
Top 10 Things Daniel loves
Today I asked our 4-year old son Daniel what he loves most right now:
 His Winnie the Pooh Bear
 The animated film Cars
 HOP - Israeli children Channel
 Thomas the Tank Engine
 Dora the Explorer
 His Computer and surfing in the Internet
 His light blue Crocs Shoes
 Meter - a character from the film Cars
 Ketchup - He plans to take this gigantic tomato cook it and make it into Ketchup
 His newly discovered Baby Blanket
Another pretty wallet
Yesterday I finished another long double folded wallet. The main cloth is again light pink cotton canvas. And the secondary is a yellowy - pinkish cotton fabric. When I did the binding with that fabric it all the time pulled together. I think the fabric was maybe too much starched (stiff) when I bought it.
I wanted to do the same wallet again so I can get better doing them:
This time I added a pleated coin compartment (more space).
The zipper I put in much nicer then last time.
I added another ID card compartment on the left top side.

Overall it came out quite nice, but I am still a little bit disappointed. For one thing I screwed up the binding again. (Last time it was not that bad!) I just have to remember to fold it over on the other side again - there is enough space! And the first zipper I sewed in on the wrong side (on the lining side). So this wallet is quite special: It has a zipper and underneath another zipper. - Which makes it quite bulky. But I didn't want to throw away that piece of cloth, so I just used it on the inside.
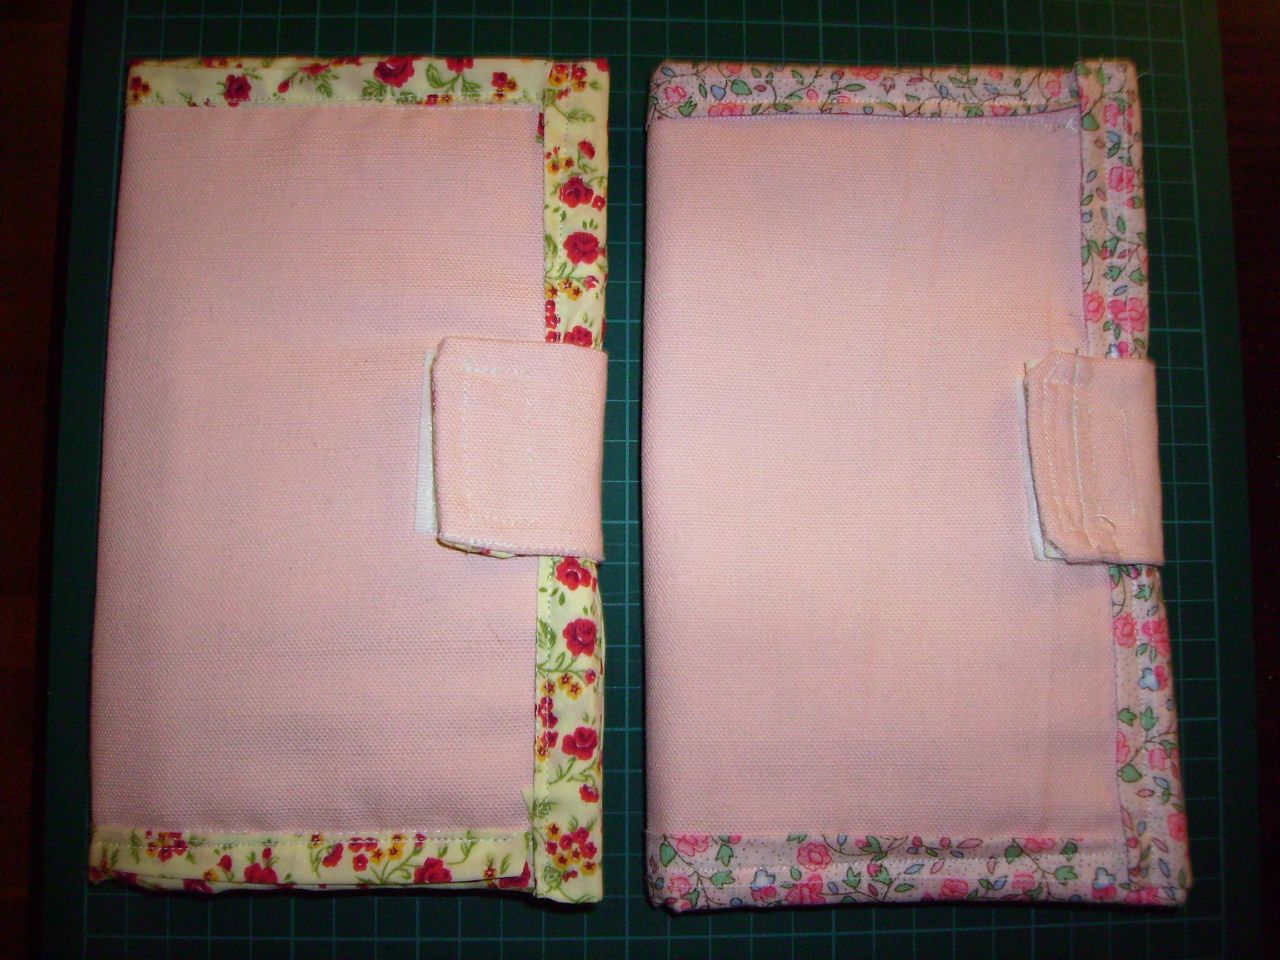 Here you see the first wallet I made about a week ago with "his new brother" ;-)
I am also quite tired of only having the pink strong canvas fabric. (You need strong fabrics for creating bags and wallets!) I am waiting already for an opportunity to go to Tel Aviv to buy some more sewing stuff and fabrics. Maybe next week...
Thursday, February 15, 2007
Camera Pouch
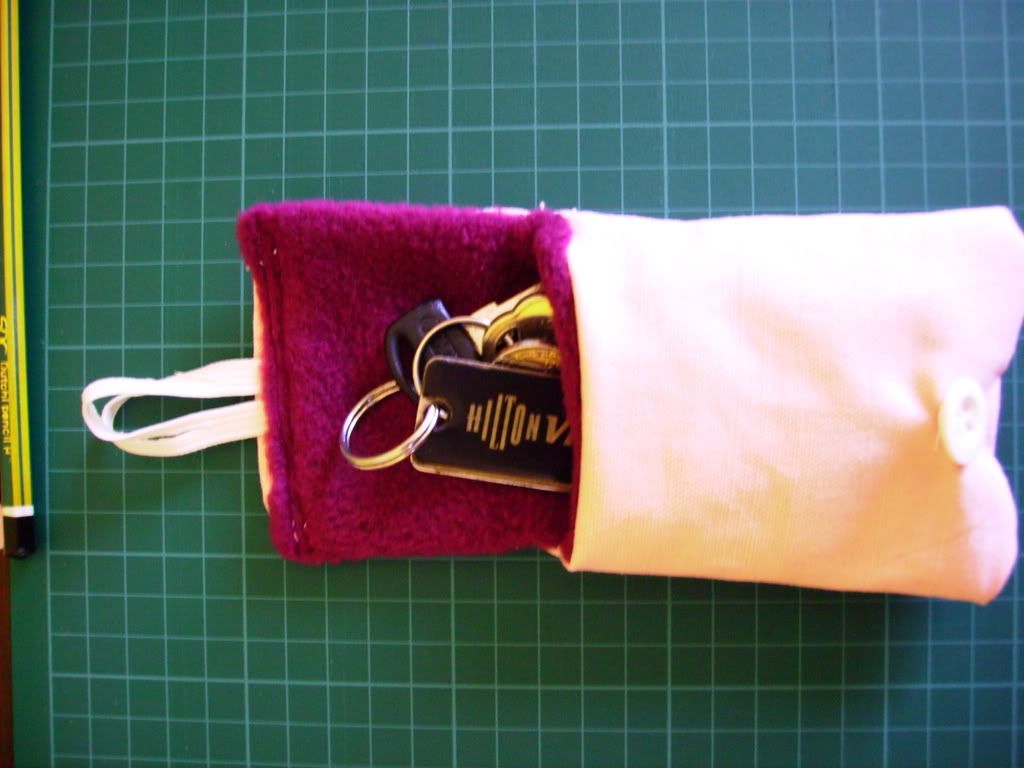
Again I found a nice idea in www.craftster.org : http://www.craftster.org/forum/index.php?topic=21586.0. As we just got a new camera I am going to make a cute pouch for it. (Not like those just uni colored black ones...)
I started by measuring (kind of giftwrapping ...) it in fabric to get the dimensions. Mine were side1 8", side2 8", side3 4.5" and side4 3". If you start off with a 8x8" square fold it into half and cut in and decide on the flap length and cut in ---and off goes that square that you don't need for it.
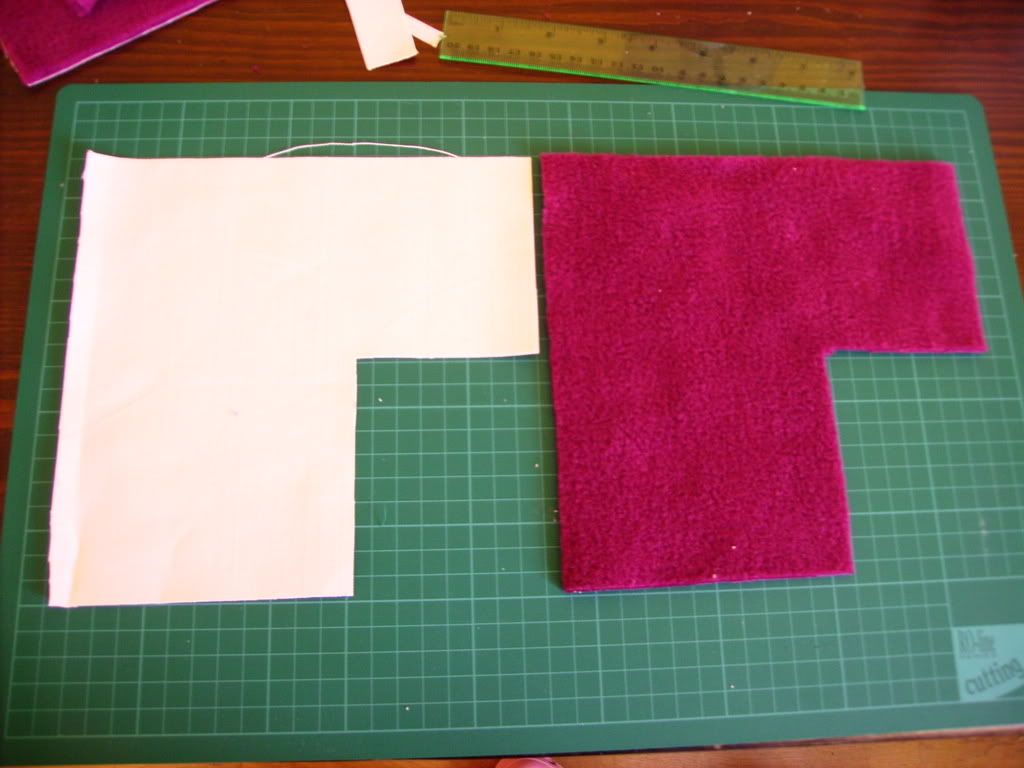
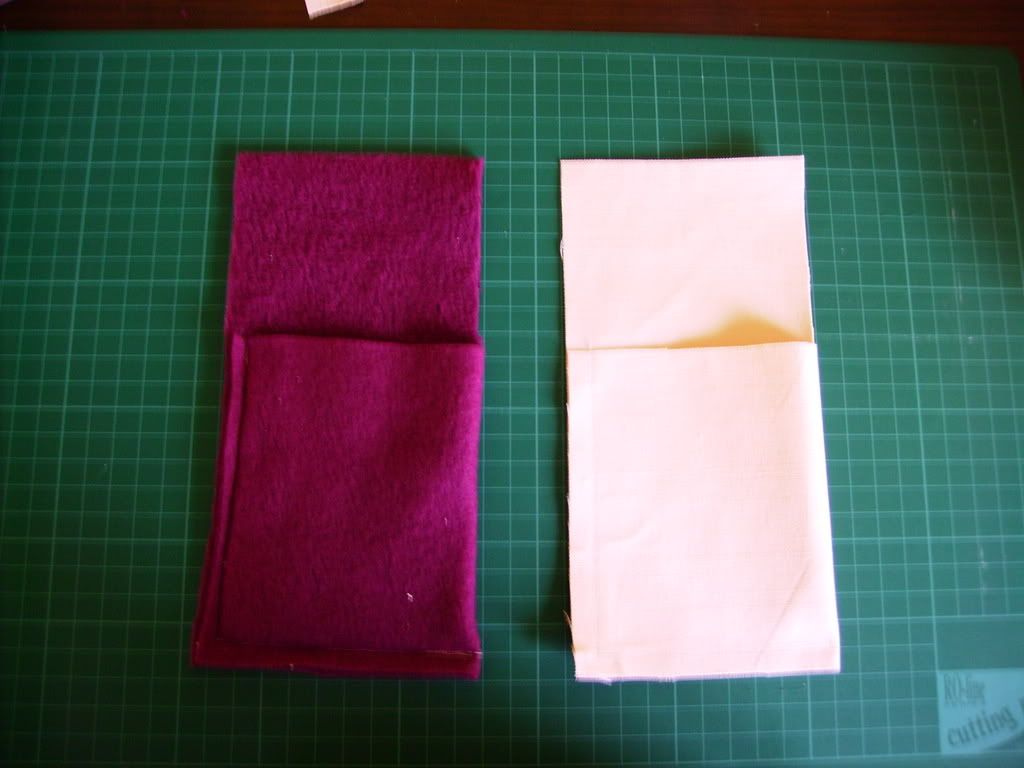
The first one I made now didn't come out right. A) It was too small for the camera in the end, B) the lining fabric was too thick to go well with the outside one.
I think you have to make the ouside pouch slightly bigger so the inside one fits nicely inside. Maybe then you can go with a thicker fabric.
Wednesday, February 14, 2007
Zipper Pocket into Lining of Bag
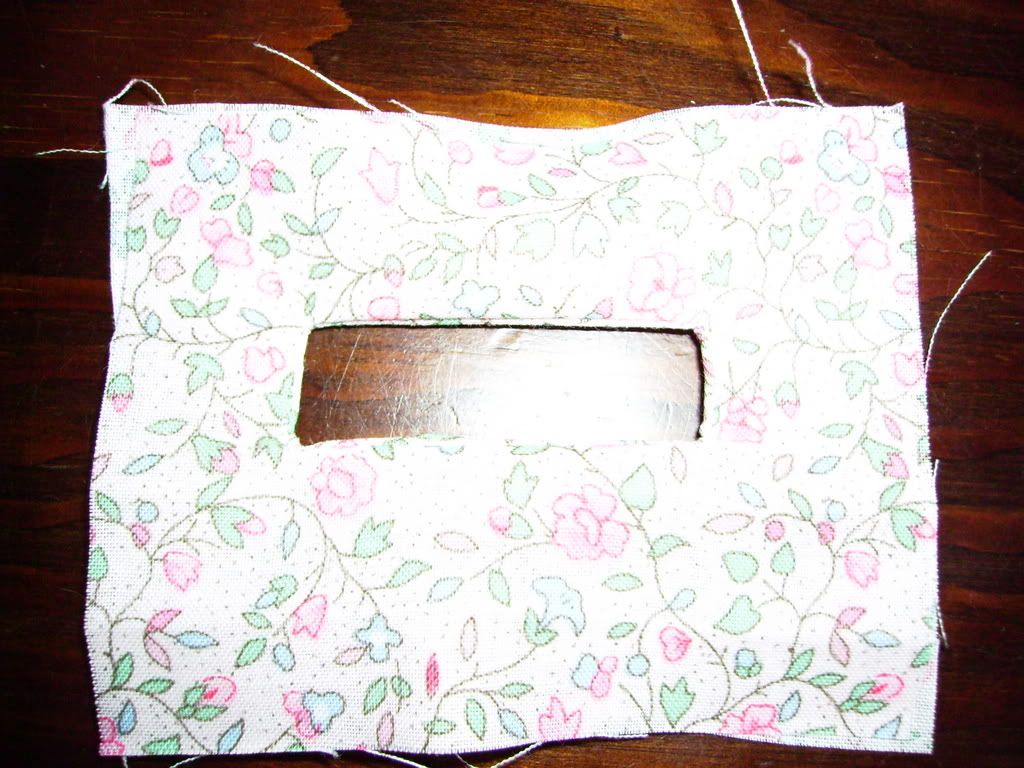
I just reconstructed SewPixie's Tutorial. (It's here: http://www.craftster.org/forum/index.php?topic=11808.0 ) It's amazing how simple it is to put a zipper nicely into a fabric. The last two Zippers I put in didn't look that good because I didn't fully understand the instructions. So that's why I just took two pieces of scrap fabric and tried it out. So from now on I think I have mastered that subject.
You start off by putting Lining and Fabric right sides together. Then you draw a rectangle as long as the zipper should be and the width between 1 - 1.5 cm (0.4" - 0.6" ). You draw a line through the center and on each side an arrow head. Now you sew along the rectangle. After that you cut out the line in the center plus the arrows. The last thing you have to do now is to pull the facing through the cut, iron and you're done!
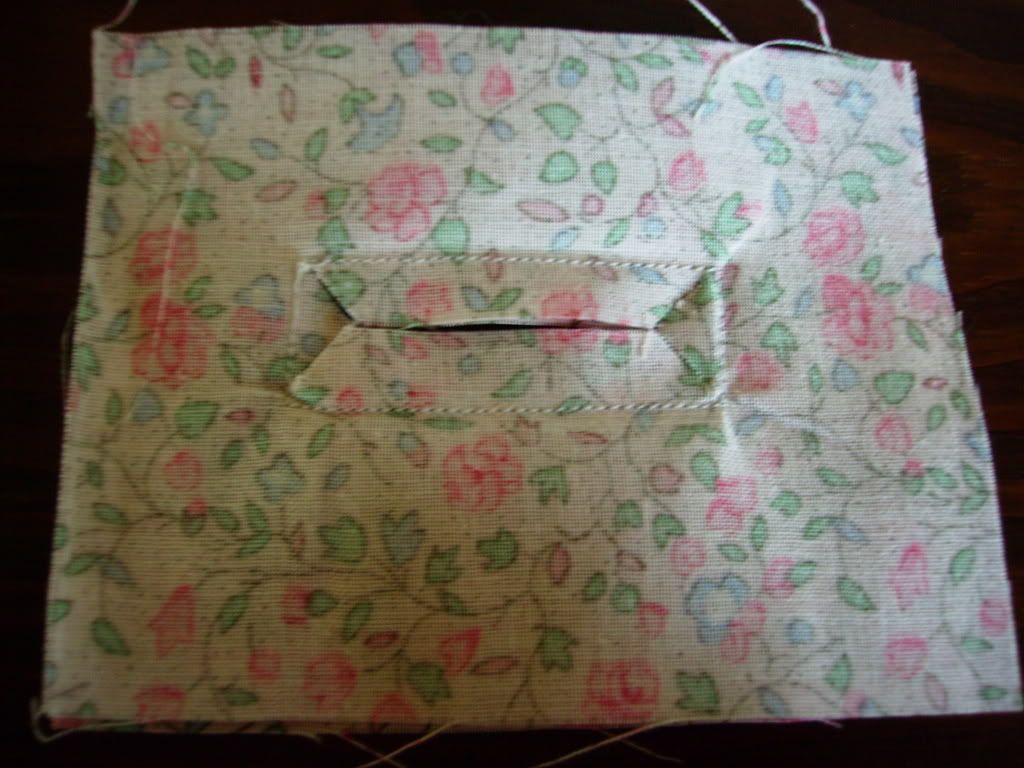 right sides together - sew around the rectangle
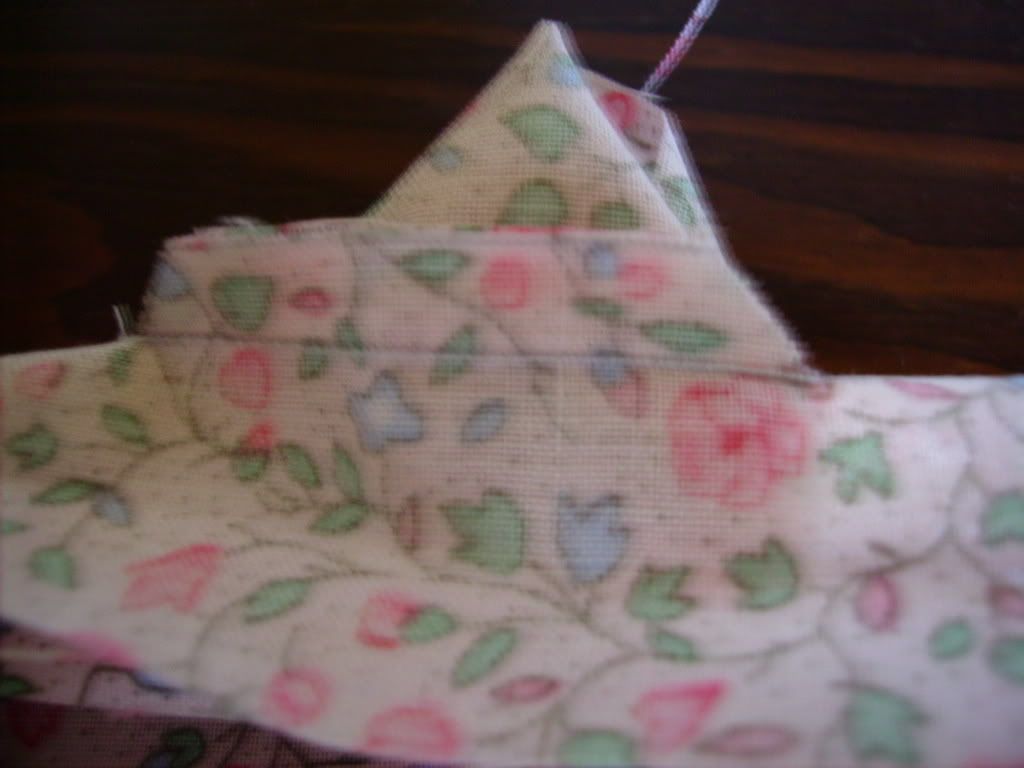 pull fabric through the cut
You can use this method for putting a pocket into a handbag or putting a coin pocket into a wallet.
Tuesday, February 13, 2007
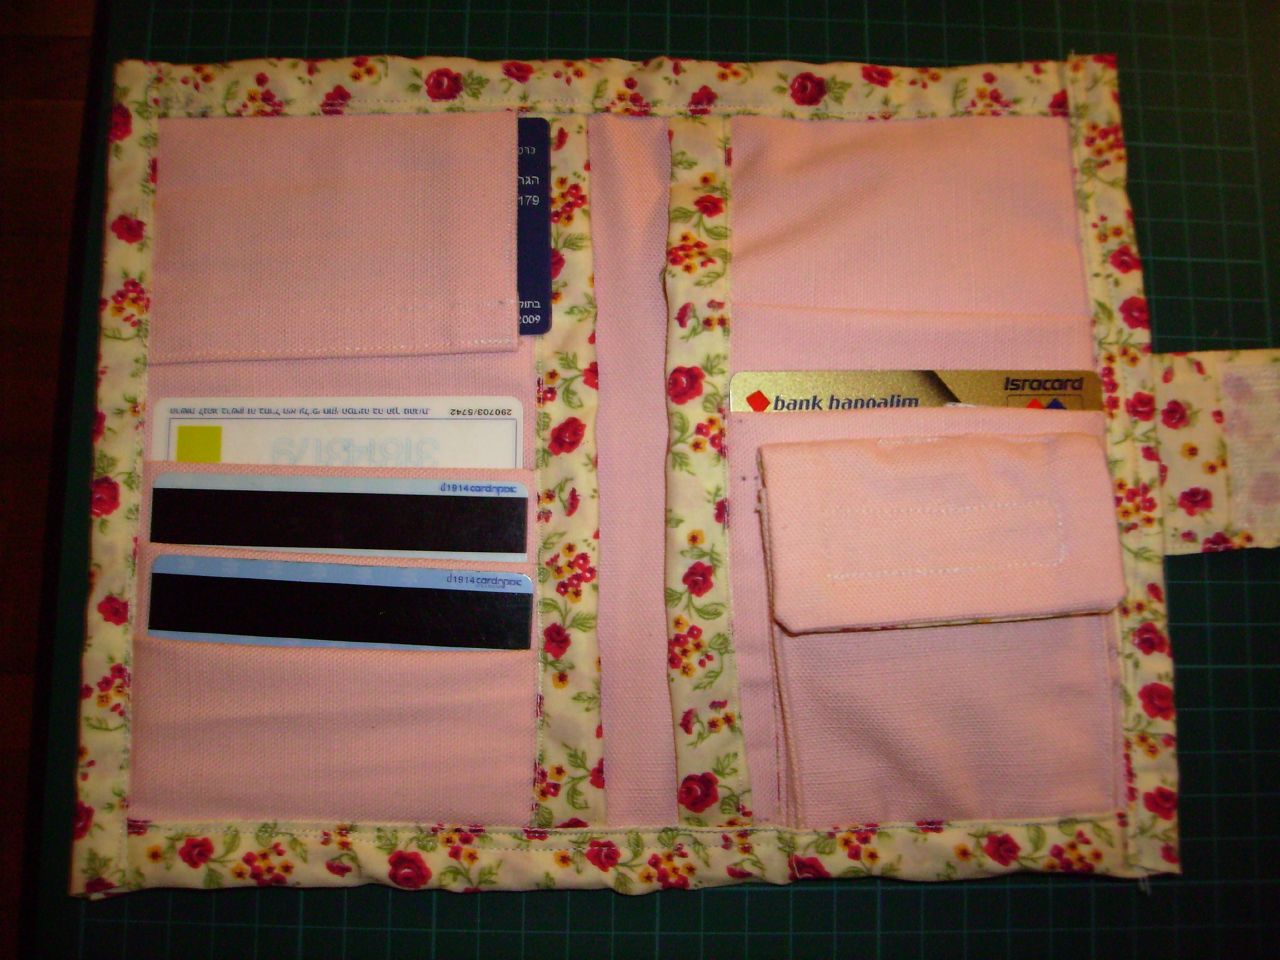
Pink Wallet
 wallet open
I just finished in a few hours a nice cute pink wallet. Whenever you try something new it takes a long time but I am sure next time I do this same purse it goes much quicker. Again, I am quite proud of myself.
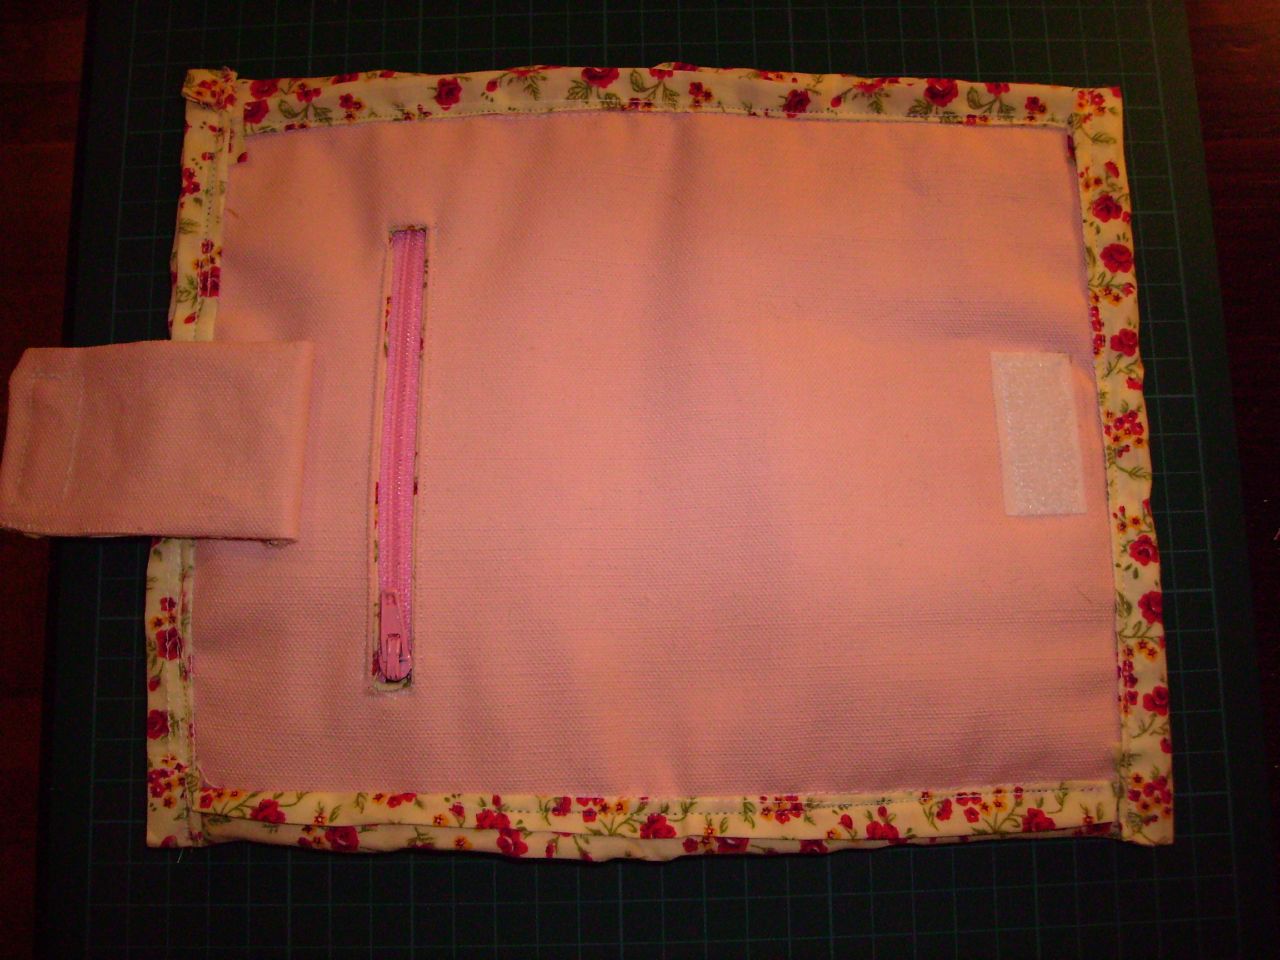
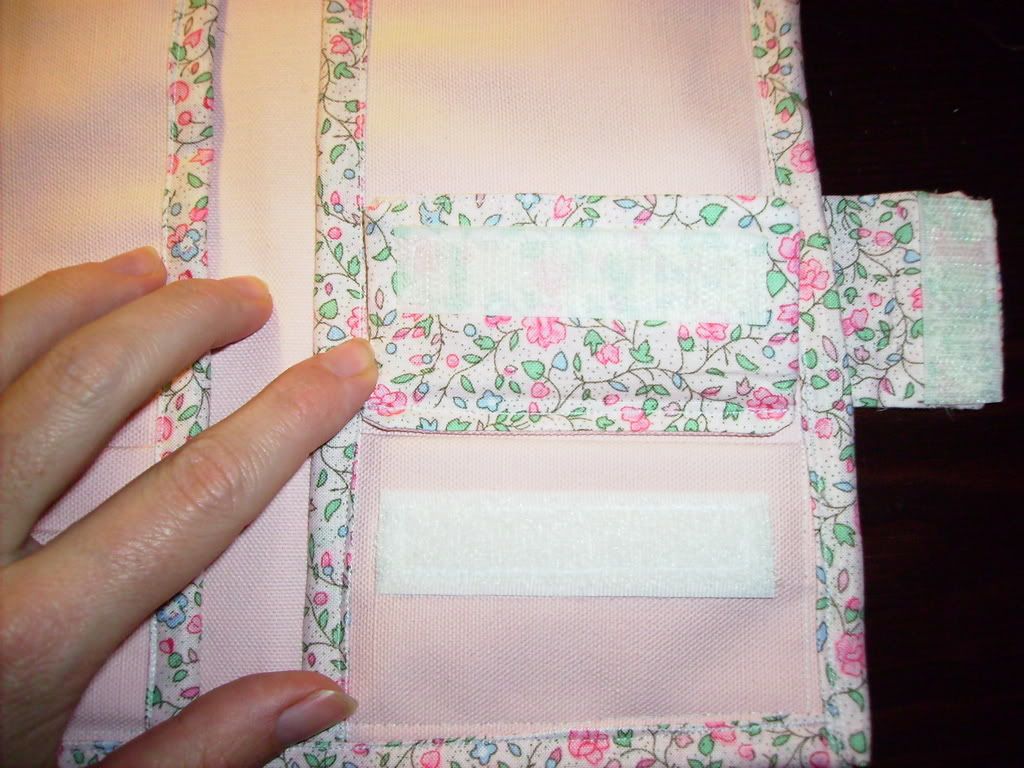
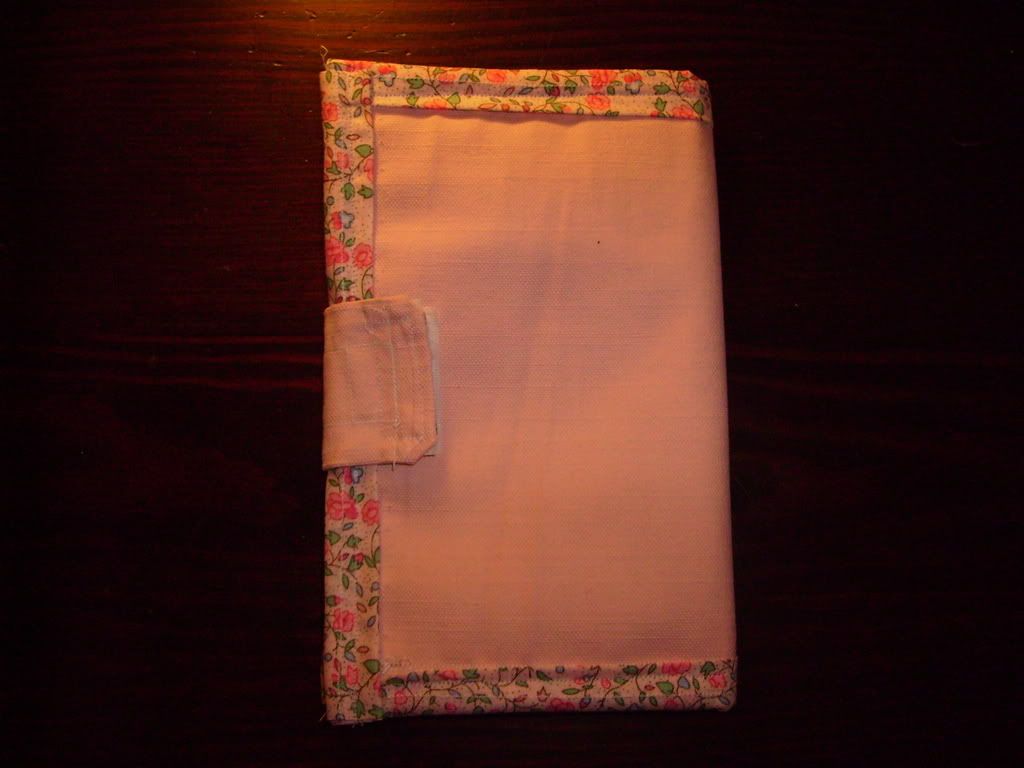
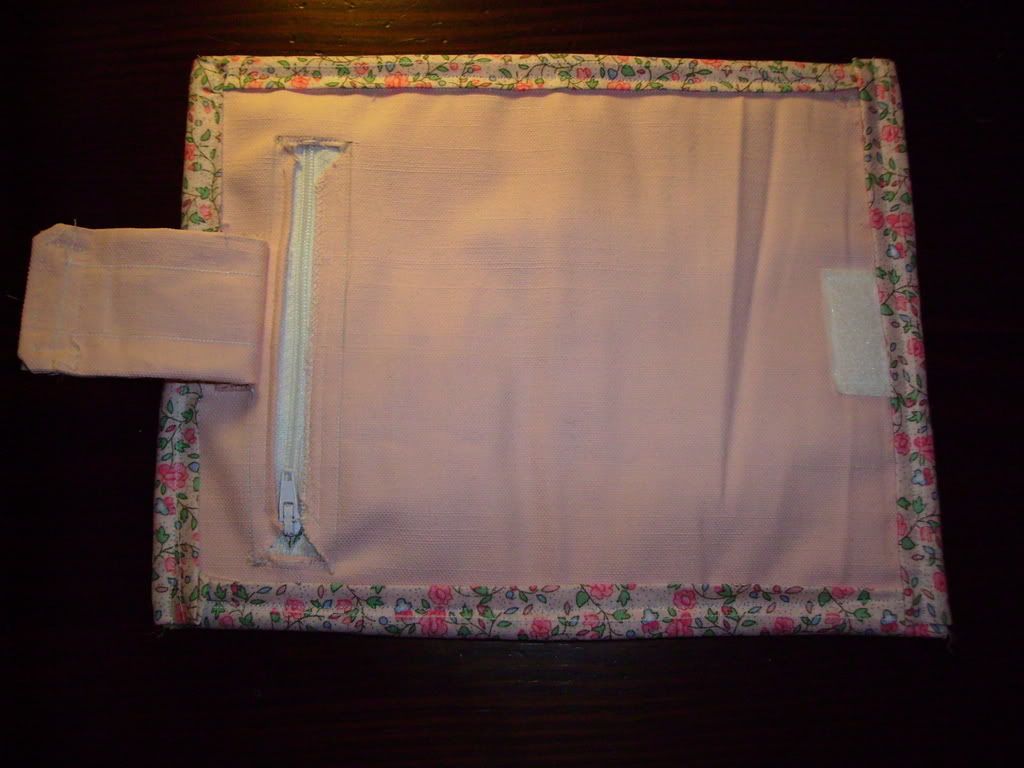 wallet from back side - with zipper pocket and closure strap
It has 3 card slots on the left side and one on the right. On the right side it has also a compartment that closes with Velcro for coins. On both sides you can put money bills (or use one of the two for a day planer). On the backside it has a zipper compartment for coins and other stuff.
The idea for this wallet I have from SewPixie and her nice tutorial on: http://www.craftster.org/ . The exact link is: http://www.craftster.org/forum/index.php?topic=16097.10 I just modified one of the left pocket card slots into the coin compartment.
The pink main fabric is strong cotton canvas and the binding/lining is regular quilting thinner cotton fabric.
Binding: Cut a long 3" strip of your lining:
3" total raw - fold in 0.5" and hem (so for marking sew down 1") on both sides of the strip. 0.5"Double - 0.5"Single - 0.5" Single - 0.5"Double.
Matching edges sew 0.5" (which takes 1.5" away on the one side, 1" from other so you stay with 0.5" for the fold) then turn over to other side so you get the right side facing you, fold 0.5" and bend it to enclose the casing and sew near the fold.
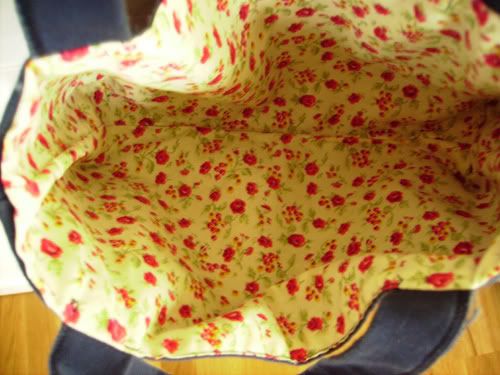
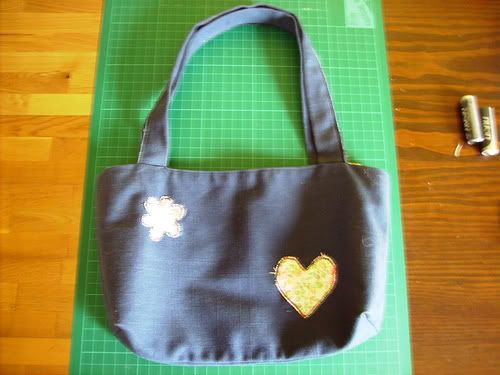
My first tote
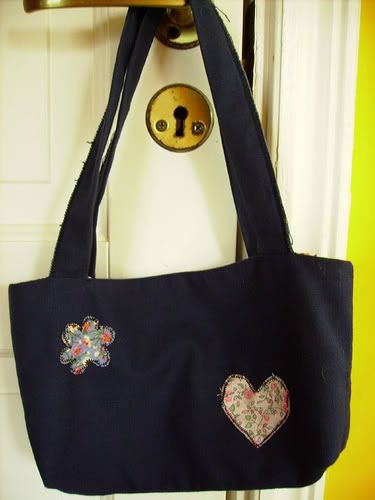
This one I made actually already a few months ago. I think it's quite cute and small. Although it should have a zip on the top so things don't fall out.
Sunday, February 11, 2007
Tutorial - Pink Cargo Pocket Diaper Bag finally finished!

After about working on it for 2 weeks my latest bag (and only 3rd total) is finished. I am so proud and really love it.

Outside I used strong light pink cotton fabric and inside a lighter cotton fabric with pink pattern.
All together it has 8 pockets. 4 cargo (accordion pockets) on the outside and 4 regular pockets (but all 8 with flaps). The most work were the cargo/accordion pockets. Firstly because I had to figure out how to sew it from the pattern and secondly everything new takes a lot of practice.
 I like the detail on the cargo pocket with the little lining rim around it.
Here is a small tutorial how to make that kind of bag:
(There might be simpler/different ways to do that kind of bag. If you know any other ways, or have some other remarks, just leave a comment at the end of this entry.)
First think of all the pieces you need:
1 Top piece: 20x36 cm (7.9x14.2 in)
1 Bottom piece: 34x11 cm (13.4x4.3 in)
2 Sides: 21x11cm (8.3x4.3 in)
2 Front/Back: 34(bottom)x40(top)x21(sides)cm - (13.4x15.7x8.3 in) you can see the shape of it on the picture
4 small Flaps: 9x8 cm rectangle (3.5x3.1 in) - cut off corners to the shape you want
4 big Flaps: 13.3x8 cm (5.2x3.1 in) (same as with small flaps)
2 small regular Pockets: 9x15 cm (3.5x5.9 in)
2 big regular Pockets: 13.3x15 cm (5.2x5.9 in)
2 small accordion Pockets: have a look at the information (link) below.
2 big accordion Pockets: same have a look at link below.
1 Zipper: 34 cm (13.4 in)
2 Straps: 100x4cm (39.4x1.6 in) (seam allowance 0.5cm (0.2 in) each side, so you end up with 3cm (1.2 in) finished width)
Velcro for the pockets to close

the top piece is missing from the picture because I originally planned the bag differently. Also, you can see the accordion pockets cut out from the lining material - you don't line them, just sew on a facing piece as described in the link. At least you can imagine how the cut out accordion pocket looks like.
-----all these from Fabric and Lining except that the accordion pockets don't need lining but just a facing piece the same length the pocket is. More on accordion pockets: Look up here:
http://www.diynetwork.com/diy/cda/article_print/1,1983,DIY_14144_2277019_ARTICLE-DETAIL-PRINT,00.html
- I made for almost all of these templates from carton (so next time I plan to do this bag I have it already ready). Then don't forget to add seam allowance. I took 1.5cm (0.6 in) for mine. Then cut them all out.
- Sew all the flaps together. Take the inside part of the flap (lining) and sew onto the right side the male Velcro patch. Then Fabric and Lining - right side to right side - leave the top side open for turning - turn and sew the last side.
- Sew the inside pockets. I lined each of the inside pockets. (Fabric/Lining - So there is a contrast between the lining of the bag and the pockets.) Sew as point 2: put together right sides, sew 3 sides, turn inside out and sew last side. Don't forget to sew onto the right spot (measure according the flap Velcro) the female Velcro patch. This picture shows a double pocket. (Just a little gimmick.)
- Take the lining front/back piece decide where exactly you want the big pockets you just sewed in 3 and pin/sew. Attach the flap: lay it so that lining of bag and outside of flap are together and sew. (I mean don't sew the flap in closed position on the pocket, this way looks much nicer and you don't see any stitches when the flap is down.)
- Repeat for smaller side pieces.
- Now put the lining bag together: Start with the bottom piece and attach the front, back and both sides. Take care to sew exactly on the lines to keep it accurate. Then sew sides to front/back until you end up with a nice inside bag.
- Now comes the most tricky part - to sew the accordion pockets. First prepare the facing: Turn top/bottom of it 0.5cm and sew. Attach the strip right side to right side of pocket. (Left side is up.) Bend it over to left side and pin down and sew. Now you have this nice rim. Pin together the corners of the pocket. The left side (writing and drawing) is outside and sew on the line the corner. Repeat for the other side. Bend and sew all 6 vertical lines almost up to the corner. This also on the left side. Turn inside out
- Sew the finished accordion pockets onto the fabric. I started with the bottom line and sewed almost up to the corner. You need to leave it a little bit open so you can tuck the sides nicely in. Sew the sides. Repeat with all other 3 accordion pockets. Wow! Now the hardest part is over.
- Sew the fabric pieces together as in step 6.
- For the top part, pin and sew right sides together, again along 3 sides, leave one open for turning and sew after turning the remaining one. Draw the zipper exactly how you want it onto the top part (fabric). Sew along the outside line so you have a rectangle. Cut open the inside like an arrow. Put the zipper inside between lining and fabric, turn fabric a few mm in and sew in place. ( I know it all reads easier than it is done!)
- Do the straps: Sew together right sides on 3 sides, turn inside out and sew last side. Then left and right of the strap (about 0.5cm) sew down, so the straps look nicer and hold better their shape. I did mine pretty long - about 100cm. You just have to find out how you want them to be.
- Put the inside/outside bag and straps together: Take the fabric (outside of bag): Right side inside, left side outside. Into this one you put the lining: right side outside and left side inside. Put the handles accordingly inside so that only a few cm stick out. The handles have to correspond properly. Sew along the line but leave quite a space open for turning. Turn inside out and sew the last part like this.
- Last part to sew the top into place. I started first with the sides, then did all 4 corners and at the end the front and back.
- Finished!


 just the picture of the zipper (in the finished bag)
Subscribe to:
Posts (Atom)